Agilo velomobile

Me? A year! :LOL: I was in solitary confinement so I spread it out and did a little each day to preserve my sanity. The first confinement was a 1 km radius from home... And also my budget was only 200€ a month.

I think the estimation of 4 weeks on the web site is realistic. One condition, buy the velomobiel.nl parts and the swing arm before you start, having them on hand will make construction faster because you will be able to test fit as you proceed.
Hmm i heared that australia/new zealand was an island of british convicts. Dont worry the whole globe is turning into a prison soon enough, electronic gulag :)
 
You should. I have them in my Alleweder, have only used the platform side yet but it has good grip with everyday shoes. Only downside is that finding the right side and positioning the feet is a bit fiddly first.

I will eventually when I have a spare 150€ for pedals and shoes but right now I more urgently need 2 front wheels... ;)
 
The only positive thing I can think of about Australia is that they have cheap vélomobiles and a vélomobile racing scene... (see how I stayed on topic there :sneaky: ).
 
I searched in media and on the forums and did not find a clear photo of "Bremsschalter"

Before I start playing with my tiller I would like to see how others have installed the brake light switch

TIA
 
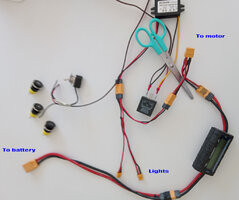
Now that I am sure that it works here are the electrical bits.

circuit.jpg

Chinese 50v -> 12v buck converter, 12v LED flasher and my faithful HobbyKing Watt meter

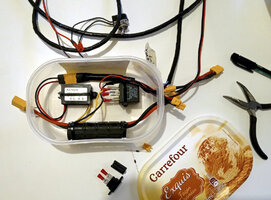
exquis.jpg

All of this is mounted in an electronics box which slips in between the battery and the steering tunnel, the Watt meter is visible if I move my leg. There is an on/off switch on the 12v feed for an eventual fan.

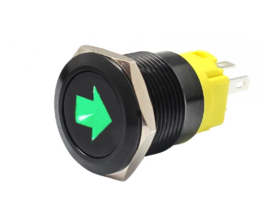
switch.png
The indicator and hazard switches are push button type and have flashing LEDs so that you know they are on. They will be mounted to a dashboard (I hope tomorrow).

Yes 3 switches are heavier than 2 but I don't need another LED or buzzer (yuck...) to tell me they are on.

The horn bulb has also fond a home on the central column.
 
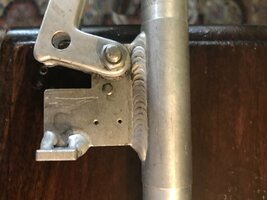
The Brakelight switch is screwed in to the fixed part of the lever, the metal prong is then bent so that it sits along the moving part of the lever. This picture shows the two holes where it is normaly mounted in. The micro switch is a normal off switch, so its off, when the prong is against the plastic, and on when free. ( i assume u got the Velomobiel.nl micro switch?) Some bending of the prong will be required.


detail stuurtje.jpg
 
Habe mir auch den Plan für das Agilo geholt, und möchte demnächst loslegen. Nach tagelanger Recherche kann ich absolut keine Bezugsquelle für wasserfest verleimtes 3mm Pappelsperrholz finden. Kann jemand helfen?
 
Wirf mal einen Blick auf Beitrag #42ff in diesem Thread.

Pappelholz ist vergleichsweise sehr wenig feuchtigkeitsresistent. Deshalb hat eine Verwendung in feuchtigkeitsbelasteten Umgebungen kaum einen Sinn, und deshalb gibt es wohl auch kein wasserfest verleimtes Pappelsperrholz. Natürlich kann man Pappelholz versiegeln. Das ist aber wegen der sehr offenen Holzstruktur aufwendig und macht den Vorteil der geringen Dichte mehr oder weniger zunichte. Aber wenn man diesen Weg trotzdem gehen will, benötigt man auch keine wasserfeste Verleimung mehr - die ist ja geschützt.

An Deiner Stelle würde ich mit der leichtesten im Boots- oder Segelflugzeugbau verwendeten Holzart bauen. Okume? Ist m.W. gerade mal 20% schwerer als Pappel, wenn man die Dichte der Verleimung einkalkuliert.

Das Agilo ist als leicht nachbaubar konzipiert, nicht als Leichtbau i.S. geringer Fahrzeugmasse.
 
Danke für die Erläuterung der Zusammenhänge, das ergibt jetzt ein für mich schlüssiges Bild zu dem was ich auf dem Markt als verfügbar gefunden habe. Dann werde ich wohl mit Okume bauen, da hatte ich schon was in Norddeutschland für den Bootsbau gefunden.
 
Habe mir auch den Plan für das Agilo geholt, und möchte demnächst loslegen. Nach tagelanger Recherche kann ich absolut keine Bezugsquelle für wasserfest verleimtes 3mm Pappelsperrholz finden. Kann jemand helfen?

Sorry for the late reply, the 3rd dose wasn't very pleasant...

If you look at the web site you will notice that Bodo Sitko suggests using a mix of woods, we talked about this together and it is the way I would build:
- the outer body in poplar (sides, roof,...)
- some of the internal parts that are not exposed to the exterior
Building this way you could possibly save 3 kg or more.

My plywood supplier (Joubert) said that from time to time they do make small batches of poplar with Type 3 glue. He also said that poplar can be as dense as okoumé, it depends on the tree the plys were cut from.

Now of course we are waiting for your building photos and comments here in the thread :giggle: And don't hesitate to PM me if you have any questions you don't want to ask on the forum.
 
As long as it is coated on both sides, I would recommend rolling on a coat of epoxy on the outside of the floor and in the wheel wells (even with okoumé). I had a boat that was made with non Type 3 glue, it lasted for years and the only place that got rot was where the paint was scratched.

Okoumé is (slightly) denser than poplar but it is just about the same when it comes to not liking water:

 
Vielen Dank für die Ratschläge. In meine Überlegungen ziehe ich die Tatsache mit ein das große Flächen für die Formgebung komplett durchfeuchtet werden müssen. Das würde nicht wasserfest verleimtes Sperrholz dann wohl zerlegen. Eine "Beschichtung" in irgendeiner Art wird wohl sowieso angebracht sein. Damit überlege ich auf nicht wasserfest verleimtes Pappelsperrholz zu gehen, ohne die starke Formgebung wie beim Agilo zu bauen, bzw vom Plan komplett abzuweichen und eine Eigenkonstruktion zu bauen.
 
Just wetting the the poplar ply enough to bend it does not have any effect on the glue, there is not enough time for the water to get through the outer ply. My okoumé was not marine grade and it looked horrible after being soaked before bending, lots of fibres lifted off the surface.

There is only one tricky place when you bend - the nose - most of the other parts are only bent one direction. I didn't use a drop of water on the roof and that bends both ways.

There are 3 poplar Agilos, 2 on the road - the prototype and Norbert's - and @JanR is almost finished. Maybe he would be best for information on how the poplar ply bends, I think his build looks much cleaner and smoother than mine.
 
Bei Okoume Sperrholz vielleicht gleich morgen bestellen
Habe jetzt bestellt und war mir nicht ganz sicher wegen Lieferort und Zeit und hab die Auskunft bekommen das sich das bis zu 30 Prozent verteuern wird
 
The Brakelight switch is screwed in to the fixed part of the lever, the metal prong is then bent so that it sits along the moving part of the lever. This picture shows the two holes where it is normaly mounted in. The micro switch is a normal off switch, so its off, when the prong is against the plastic, and on when free. ( i assume u got the Velomobiel.nl micro switch?) Some bending of the prong will be required.


Anhang anzeigen 270934

Back to brakes. Yes I have those holes in my tiller and I know the type of microswitch there are similar ones on my 3D printer as limit switches. So from where the holes are and the way the parking brake works the switch is of type open circuit when the switch is pushed down and closed circuit as soon as you pull on the brake lever and the switch is released.

I have of couse come up with a radical solution completely out of the box. Well completely out of the parts box :LOL: I have a Wuxing push button switch which I will mount on the tiller. When I brake my thumb pushes on the switch and the brake light comes on.

I know it sounds silly, you have to remember to push the button every time you brake, but:

- the gesture is natural with the button opposite the brake lever
- I can turn on the brake light without braking :sneaky: you all know why I want to do that...
- I can put another switch into the circuit and have the brake light always on (yes I am looking outside into thick fog...)
- I can manually flash the brake light even though I have hazard lights

Of course I will let you all know how that works out.
 
Zurück
Oben Unten