Agilo velomobile

My swing arm mount is not standard because I set out to build my own swing arm so I can't really answer that question from experience, sorry. I had a 20 mm axis hole and so had an aluminium piece turned to reduce it to 10 mm.

You need a 10 mm bolt that is smooth and not threaded where it goes through the wall of the wheel well. If you are worried about permanence I would take a large washer, drill two holes in it and screw it to the outside of the wheel well. Grease well if you use stainless steel, it will squeak...
 
The whole gearing question depends on where you live. If I lived and drove somewhere flatter my 2 x Alfine 8 with 39-53 chainrings would work - the major problem being the huge gap between 5th and 6th gear, what were the engineers at Shimano thinking? Of course they were thinking the Alfine 8 would only be used in 26" or 28" city bikes and people would be riding between 15 and 32 km / h top speed ... Unfortunately that place between 5th and 6th gear is where Agilo wants to be at cruising speed (with me pedaling my >150W). Somewhere between 27 and 37 km / h on flatter roads. I always simulate in the gear calculator with a top speed of 45-47 km / h at cadence 90 because it is a realistic top speed at cadence for this particular vélomobile. I am completely at ease in this vélomobile at 45 km / h because of the wide 800 mm track, handling is very predictable and down our steeper hills I just let it roll.

Agilo is a little faster than first I imagined and the 25 km / h assistance is really only there for the hills, 27-30 km / h in 5th gear is very quick and easy to reach. Or, I can imagine lazy cruising at 25-27 km / h without putting in much effort for a long 10 hour drive, that would probably only require a 900 Ah battery (mine is 660 Ah). I need to confirm those numbers on a longer flat road drive and that is difficult where I live.
 
The Brakelight switch is screwed in to the fixed part of the lever, the metal prong is then bent so that it sits along the moving part of the lever. This picture shows the two holes where it is normaly mounted in. The micro switch is a normal off switch, so its off, when the prong is against the plastic, and on when free. ( i assume u got the Velomobiel.nl micro switch?) Some bending of the prong will be required.


Anhang anzeigen 270934

I have looked at my tiller. I have looked at this photo. And I have looked at "normally open" micro switches.

The lever moves away from the switch and not towards it so I bend the metal strip to maintain the switch down and when you pull on the brake it clicks up and closes the circuit. It took me a long time to understand that. :rolleyes: When you flip the parking brake on it also depresses the switch so the brake light light does not come on when you are parked. On Monday I order 5 x micro switches (2.10€ + free shipping) from my old buddy Ali... :giggle:
 
@anotherkiwi Hast Du ein oder zwei Fotos von der Schwingenaufnahme beim Bau gemacht? Mich würde interessieren, wie die Lagerung dort gelöst ist. Ich konnte in Deinem Faden nur finden, wo in der Karosserie das Loch mit dem Holzverstärkungsring zu sehen ist. Was kam denn noch an dieser Stelle an Komponenten hinzu, damit die Schwinge dort gut schwingen konnte? Und das vor allem dauerhaft?

I now understand how the Leiba swing arm works (not very clear when you are holding it in your hands). Bodo kindly explained the internals and said that epoxy gluing a large washer with 10 mm hole to the side of the wheel well is sufficient, no need for screws. Some Loctite on the thread of the bolt will also help.
 
Since most of the photos were taken Agilo #1 has been raised >4.5 mm at the front - 49-406 tyres instead of 40-406. In the coming weeks it will be lowered 3 mm at the rear - 50-406 tyre instead of 56-406. I will be fitting 3 x Gocycle tires and the Maxxis DTHs will be fitted to the trike.

My touching down issues are infrastructure problems not ground clearance problems. There are still many older speed bumps here which are just piles of asphalt with no profiling. Many have deep grooves cut in their tops by the bottom of cars which did not slow down enough... <rant mode on>These of course no longer slow down SUVs they just annoy lower cars. So the SUVs do have to slow down if they are following a car unless they use that moment to pass when driving over the speed bump at 70 km/h (it has happened to me in the car...) which is illegal in a 30 km/h zone. It seems that the software driving SUVs is programmed to break the speed limit, be on the phone, be on my side of the road (especially in corners) and totally ignore stop signs and even red lights if possible... And of course automatic parking means at least 30 cm of the small van is outside the parking spot blocking the road. </end of rant>

Several other new features are planned for the coming weeks ;) 2022 will be the year of Agilo :LOL:
 
Danke @anotherkiwi Das hilft schon etwas weiter. Ich bin ja gerade am Überlegen, ob ich mir ein Agilo bauen oder wieder auf ein Mango zurückgreifen soll. Mein handwerklicher Tatendrang tendiert wie immer zu Ersterem. Jedoch würde ich die untere Frontpartie etwas in die Höhe ziehen müssen. Mein Pendlerweg hat teilweise üble und abrupte Höhenunterschiede. Und das nicht nur auf Grund von tiefen Löchern im Belag.
 
Agilo #1 wishes all forum members many trouble free km in 2022!

Special thanks to those who have helped along the way in 2021, you know who you are ;) And wishes all Agilo builders successful completion of this exciting project!

My New Years wish for 2022 is to be able to drive to an almost normal Spezi the last weekend of April and meet many of you there!
 
Today was the first "workshop" day of 2022:

- replaced the right hand brake line (inner and outer), the Hidden Wire Brake Sensor was removed and I think that it may have been part of the problem. Now it is Teflon coated and both brakes work in harmony - just the parking brake to set correctly. The interior looks much more tidy too!
- I turned the nylon bearing for the tiller shaft 120º and now the steering knuckle does not foul on the bolt... Silly little detail with big impact, the steering has gone from very good to almost perfect.

Tomorrow is our last day of nice weather so I will continue:

- reinstate chain tubes on the pulling side, mostly to allow me to drive in jeans during January and February
- better install the headlight
- finally connect up the brake light (more details on that soon)

Test drive home:

- brakes and steering (y)
- speed sensor (n) it is cutting out over bumps, that leads me to believe there is a short circuit somewhere... Will look tomorrow.
 
:LOL: I have to use my outside parking space as a "workshop" I meant to say.

Snow? Where I live that stops at about 300 metres altitude, once in 10 years we had some briefly on the beach.
 
Today I finished building my Agilo. That does not mean that over the coming weeks I will not be adding some improvements ;) what I mean to say is that it has been completed and is ready to drive whenever I want to, everything works as it should. Well maybe not the speed sensor but we shall see, it may have moved a little too far from the magnet.
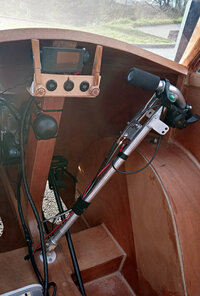
tidy-interior.jpg

The cockpit is tidier and functional:

- chain tube on the pulling side means I can change gears really easily, much more easily than with a glove, and drive in jeans without getting oil on them. Chain tubes held in place by a Ginkgo bracket which is much better than the one I had before Note to builders: much easier to install before you glue the seat in...
- wires have been gathered in plastic spiral wraps
- the green button on the tiller lets me light the brake light, even when I am not braking... A security feature :giggle: The wiring is also ready to be plugged into a micro-switch activated by the brake lever.
- the horn bulb has found its place and is easy to reach and honk, it is held on by a spare metal U bracket from some Ikea furniture
- the screws that hold the dashboard on have an elegant protection in case of accident :unsure:
- the clothes pegs hold the top of the windscreen folded open for ventilation, it is held closed by a Velcro
- the dashboard conceals the buttons to turn on the LCD but they are very easy to reach when you know where they are = security feature
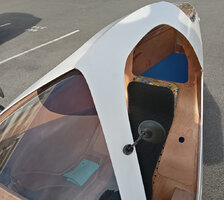

uv-film.jpg

This tiny 210 x 297 mm sample of UV film already brings huge benefits in this season of low to the horizon sun. The plan is before the summer to enlarge down to the level of the mirrors, along the top of the side windows and of course all of the rear window. A clean and tidy interior with lots of space just waiting for a driver :LOL:

The luggage compartment next to the door hold tools, groundsheet, a bit of foam to kneel on and other tech stuff. On the other side clothes, a micro fibre towel for the engine, etc. Personal stuff.

To-do:

- make a wooden electrics box, the plastic one is already broken
- mount the headlight better
- paint
- mount the new wheels and tyres...
- take more photos
 
The whole wood thing is because with paint:

- too light you get reflections in the windows
- too dark you heat the interior
 
The Leiba Classic is kept in a surprisingly light grey. Something like that in semitransparent , maybe slightly darker than the Leiba, but with visible structure of the woold would probably look really cool. Mhmm, really light (white?) in the front - everything in front of and including the wheel cases, and darker where reflection into the screen would matter? (i do not like the contrast between wood and the color of the outside).
 
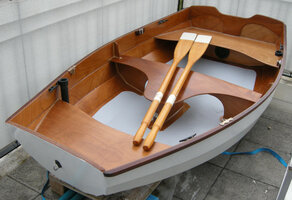
boat.JPG

Gray floor I thought about :giggle:

Doesn't marine grade okoumé varnish up nice with satin varnish compared to CTBX grade!
 
Mir gefällt, dass Du das Armaturenbrett in Holz gefertigt hast und auch bei der Elektrik-Box so fortfahren willst. So bleibt das Thema durchgängig erhalten.
Apropos Holz innen und so: Wie ist eigentlich das Klima beim Fahren? Du bist ja nun schon eine Weile mit dem Agilo unterwegs. Staut sich die Wärme/Feuchtigkeit beim Fahren. Ich sah das Microfasertuch. Beschlagen die Fenster schnell, wenn es draußen kälter ist und Du ordentlich in die Pedale trittst?
 
My Agilo is white, I really need a thermometer to give exact numbers but when you touch inside under the hood the wood is cool where there is white paint and quite warm where it is varnished under the windscreen. I would have to test drive a glass or carbon vélomobile to verify but from my experience with CF rowing shells wood is an excellent thermal barrier. Dark paint jobs look very nice but where I live they are not a very good idea, there is a Quest in a village near me and it is... white! ;)

The ventilation system designed by Bodo Sitko really works. As long as you are moving the windscreen will not fog up because all warm air is extracted from the inside through the back of the seat. In my case I sweat quite easily but when I drive I have a dry back! It is very surprising at first, I am used to sweating in the mesh seat of my trike.

The internal volume is large for a vélomobile so there is much more air to heat. There has never been any condensation inside on the wood, I don't think that is possible, maybe @tieflieger can tell us what his smaller internal volume brings? The microfiber serves to absorb sweat that drops from my elbows onto the wood beside the seat or any rain that comes in when i drive with the window open and to wipe down the body when I get home to the garage. Yes, it could also be used to wipe the inside of the window when i stop to chat with someone but that is not a regular thing. Once I had a "problem" because I had my polar fleece jersey on, I was sweating much more than usual, and the external temperature was about 6ºC, the cockpit was full of shopping and that was preventing me from pedalling at my usual cadence. As soon as I started rolling downhill again the screen cleared. Not a typical situation and it taught me to keep my driving space clear and remove any warm clothing before driving! Learn by experience :giggle:
 
Zurück
Oben Unten