Install the app
How to install the app on iOS
Follow along with the video below to see how to install our site as a web app on your home screen.

Anmerkung: This feature currently requires accessing the site using the built-in Safari browser.
Du verwendest einen veralteten Browser. Es ist möglich, dass diese oder andere Websites nicht korrekt angezeigt werden.
Du solltest ein Upgrade durchführen oder einen alternativen Browser verwenden.
Du solltest ein Upgrade durchführen oder einen alternativen Browser verwenden.
Agilo velomobile
- Ersteller anotherkiwi
- Erstellt am
- Beiträge
- 997
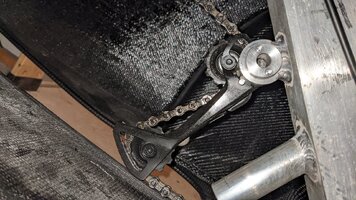
These idlers are available from velomobiel.nl, and I believe the side guide is an integral part of the whole idler.Help!
I need an idler with sides like this bottom one
Is that just some plastic cut and fitted to the side of the idler?
- Beiträge
- 4.070
Hello, on my Mango (like your picture) it's a standard derailleur cage.
Anhang anzeigen 317170
The Agilo interpretation is slightly different. The chain comes through the steering tunnel onto the main idler which is bolted to the structure and the small idler is in the air. Bumpy corner = the chain jumps off...
- Beiträge
- 4.070
Some metal angles across the chain to prevent this are not possible to make?
That is my Plan B. A plastic disk will make less noise and the chain tube I have removed has really made the journey quieter.
- Beiträge
- 4.070
Plastic disk from an ice cream container lid is now in place.
The secret of the Mango style chain tensioner seems to be finding the correct length of bungee cord so there is not too much tension on the big chainring and just enough on the small one. In any case in the workshop tests (today outside on my parking space in 22º C sunshine ) it shifts like a dream, more road testing will be required on bumpy, twisty streets which I really don't enjoy driving on...
Then when it works a photo
The secret of the Mango style chain tensioner seems to be finding the correct length of bungee cord so there is not too much tension on the big chainring and just enough on the small one. In any case in the workshop tests (today outside on my parking space in 22º C sunshine
Then when it works a photo
- Beiträge
- 7.347
Since we had 9-10°C, drizzeling and high windes today, you ain't get no like!...(today outside on my parking space in 22º C sunshine)
- Beiträge
- 4.070
Small things are being done in preparation for "The Road" 
Last year my battery charging station looked like this:

Yes I really was carrying a >1.5 kg 540W power supply
The new charging station:
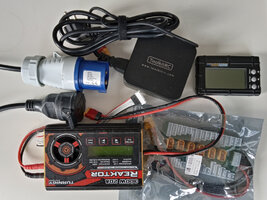
100 Watt power supply, 210 grams and my very own campground power plug adaptor but still more than 1 kg gained
The power supply is only able to output 5 Amps but that is not a problem, the charger is set to 3 Amps and it peaks at about 4.7 Amps at the most. A small joke about the campground adaptor - I paid 7.50€ for that in a small local shop. Last week we saw the same one in Decathlon, 19.99€
So executive summary for those who have not already read about my battery and charging:
- the battery is 2 x 22v 6S6P, connected in series for 44v
- that is why I have a parallel charging board, both batteries are charged at the same time
- the charger is set to balance charge, I don't use a BMS
- in a crunch the Battery Medic can be used to balance one of the batteries
- both the input and the output plugs on the charger are now male XT30, yes, I have colour coded the input side
Last year my battery charging station looked like this:

Yes I really was carrying a >1.5 kg 540W power supply
The new charging station:

100 Watt power supply, 210 grams
The power supply is only able to output 5 Amps but that is not a problem, the charger is set to 3 Amps and it peaks at about 4.7 Amps at the most. A small joke about the campground adaptor - I paid 7.50€ for that in a small local shop. Last week we saw the same one in Decathlon, 19.99€
So executive summary for those who have not already read about my battery and charging:
- the battery is 2 x 22v 6S6P, connected in series for 44v
- that is why I have a parallel charging board, both batteries are charged at the same time
- the charger is set to balance charge, I don't use a BMS
- in a crunch the Battery Medic can be used to balance one of the batteries
- both the input and the output plugs on the charger are now male XT30, yes, I have colour coded the input side
- Beiträge
- 4.070
The new brake light switch is installed.

Of course once it was soldered to the wires and screwed onto the bracket the spring went all floppy It works but it doesn't engage as soon as I would like.
Of course you recognise the bracket as one that was pop riveted to the tiller. What comes from the tiller returns to the tiller! This time with double sided tape and a couple of cable ties.
To do:
- new windows
- new front luggage compartments

Of course once it was soldered to the wires and screwed onto the bracket the spring went all floppy
Of course you recognise the bracket as one that was pop riveted to the tiller. What comes from the tiller returns to the tiller!
To do:
- new windows
- new front luggage compartments
- Beiträge
- 4.070
The luggage compartments are in, a photo when I put some varnish on.
Today the new windows
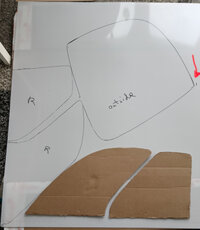
The red arrow shows a mark at 1000 mm so the rear window would not quite fit in half a sheet of polycarbonate. That is not a problem today because the rear window will not be changed. Ever again! This time I am making side windows that are very close to the original from the plan, the sliding part will slide in a 1 mm deep reserve planed into the window surround.
Builders note: always cut templates from cardboard, the shape of your windows will be close to the shape from the plan but will require some refining. Because I used stiffer okoume rather that poplar, the shape of my windows will probably be even more different than yours because of the bending properties of the different woods
The windows I removed are over 1 year old now. When you look through the windscreen at a 90º angle it looks clear and perfect but when you incline it to the correct angle all the tiny scratches appear. The original windows were changed after about a year also.
Lesson from the first time I cut, always mark the outside and remove the protective film at the last possible moment. The UV filter is on the inside.
I am not 100% confident that my 2.60€ scissors are up to the job, I may have to borrow a pair of Fiskars from her kitchen...
Today the new windows

The red arrow shows a mark at 1000 mm so the rear window would not quite fit in half a sheet of polycarbonate. That is not a problem today because the rear window will not be changed. Ever again! This time I am making side windows that are very close to the original from the plan, the sliding part will slide in a 1 mm deep reserve planed into the window surround.
Builders note: always cut templates from cardboard, the shape of your windows will be close to the shape from the plan but will require some refining. Because I used stiffer okoume rather that poplar, the shape of my windows will probably be even more different than yours because of the bending properties of the different woods
The windows I removed are over 1 year old now. When you look through the windscreen at a 90º angle it looks clear and perfect but when you incline it to the correct angle all the tiny scratches appear. The original windows were changed after about a year also.
Lesson from the first time I cut, always mark the outside and remove the protective film at the last possible moment. The UV filter is on the inside.
I am not 100% confident that my 2.60€ scissors are up to the job, I may have to borrow a pair of Fiskars from her kitchen...
- Beiträge
- 7.347
Dude, does she loves you that much*?...I may have to borrow a pair of Fiskars from her kitchen...
Think about it, Velomobile windows are not important enough to really find out...
*let me guess: She's used to that kind of trouble, isn't she?
Zuletzt bearbeitet:
- Beiträge
- 4.070
Dude, does she loves you that much*?
Think about it, Velomobile windows are not important enough to really find out...
*let me guess: She's used to that kind of trouble, isn't she?
You should have seen her face when I said I would build another vélomobile in my living room...
So the 2.60€ (for the 3 pairs
- the non-polycarbonate compatible UV film is better than the first try but of course the glue has come unstuck at one spot
- I broke some wood, third windscreen screwed in there, but some epoxy putty fixed that
- the door opens and closes much better than with my custom side windows
- all that is left to do is the Rohloff oil change
- maybe a few spots of paint here and there to hide the misery...
- Beiträge
- 4.070
D -18...  Wow that month went by fast, I will start a travel report when the time comes.
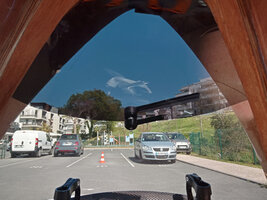
This will be my view of the world for about 3 weeks. Because of the UV film the wiper is invisible and if you draw an imaginary curve it is in the perfect spot for visibility. Merci encore @Axel-H!
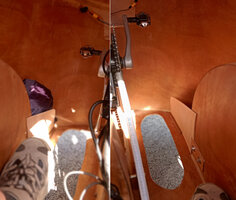
The new luggage compartments are longer than last year. Yes they are low at the front, that is so I can click out more easily. Last year there was one railway crossing where everything jumped up in the air despite me going slowly. The right hand compartment broke in half (the front bit came off), nothing fell out and I continued with the broken luggage compartment for another 400 km without losing anything. You can see the tool bag on the left.
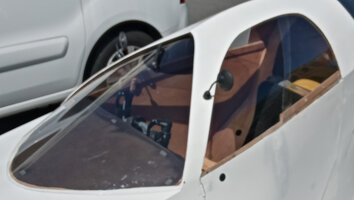
A blurry (how did that happen?) photo of the new side window, just like on the plan except for the mounting of the front part. I am ready for rain but am not hoping for too much...

This will be my view of the world for about 3 weeks. Because of the UV film the wiper is invisible and if you draw an imaginary curve it is in the perfect spot for visibility. Merci encore @Axel-H!

The new luggage compartments are longer than last year. Yes they are low at the front, that is so I can click out more easily. Last year there was one railway crossing where everything jumped up in the air despite me going slowly. The right hand compartment broke in half (the front bit came off), nothing fell out and I continued with the broken luggage compartment for another 400 km without losing anything. You can see the tool bag on the left.

A blurry (how did that happen?) photo of the new side window, just like on the plan except for the mounting of the front part. I am ready for rain but am not hoping for too much...
- Beiträge
- 4.070
D -14 
I have tested the battery charger system twice now, a solid 3 Amps and the power supply is slightly warm to the touch. 4h 40 minutes to charge the 14 Ah, so far so good!
Of course the new windscreen does not fit perfectly at the bottom, I mean I traced the existing one onto the polycarbonate, what could go wrong? I think some nice white tape will stop too much air getting under there at > 50 km/h like yesterday.
Lots of stuff is out being checked off the supplies list, the Rohloff oil change kit is ordered...
I have tested the battery charger system twice now, a solid 3 Amps and the power supply is slightly warm to the touch. 4h 40 minutes to charge the 14 Ah, so far so good!
Of course the new windscreen does not fit perfectly at the bottom, I mean I traced the existing one onto the polycarbonate, what could go wrong?
Lots of stuff is out being checked off the supplies list, the Rohloff oil change kit is ordered...
- Beiträge
- 4.070
D -10 
Yesterday a 100 km (99.24...) training run. Now I only I have a couple of really tiny improvements and the Rohloff to look after.
- 99.23 km
- 3:45:25
- 26.41 km/h average
- 73.04 km/h top speed
- my feet did not fall asleep
- my knee is OK
I only stopped twice, mostly because I wanted to stress test my left knee. Travelling I will stop every hour. During recent work I moved the BB about 3 mm forwards, it is hard to believe the gain in comfort!
The top speed was obtained without a full windscreen, it popped in at the top because the velcro patch didn't hold So 73 km/h holding the windscreen with one hand and the tiller with the other and braking at the same time...
  Oh, and against an 8 km/h headwind*. The gradient is about 4% and over 1 km long with a baby bottom smooth surface and wide sweeping curves with no intersections. Vélomobile paradise, I will return one day with a firmly attached windscreen.
The outside temperature was 15-16º C and inside rose to about 30º C at arrival. I took my long sleeved T-shirt off at one point and the windows fogged up because I was in slow traffic at about 10-15 km/h. As soon as the speed reached 20 km/h again the windscreen cleared instantly. The right hand side window was closed all day.
After his shower the driver weighed in and weighs 5.5 kg less than last September
*the headwind speed was measured using the difference between cruising speed along the same section of flat road - 27 km/h in one direction, 35 km/h the other way. The gear calculator gives 31 km/h for the Rohloff in 11th gear in my configuration, seems quite exact to me if you average those two numbers!
Yesterday a 100 km (99.24...) training run. Now I only I have a couple of really tiny improvements and the Rohloff to look after.
- 99.23 km
- 3:45:25
- 26.41 km/h average
- 73.04 km/h top speed
- my feet did not fall asleep
- my knee is OK
I only stopped twice, mostly because I wanted to stress test my left knee. Travelling I will stop every hour. During recent work I moved the BB about 3 mm forwards, it is hard to believe the gain in comfort!
The top speed was obtained without a full windscreen, it popped in at the top because the velcro patch didn't hold
The outside temperature was 15-16º C and inside rose to about 30º C at arrival. I took my long sleeved T-shirt off at one point and the windows fogged up because I was in slow traffic at about 10-15 km/h. As soon as the speed reached 20 km/h again the windscreen cleared instantly. The right hand side window was closed all day.
After his shower the driver weighed in and weighs 5.5 kg less than last September
*the headwind speed was measured using the difference between cruising speed along the same section of flat road - 27 km/h in one direction, 35 km/h the other way. The gear calculator gives 31 km/h for the Rohloff in 11th gear in my configuration, seems quite exact to me if you average those two numbers!
Zuletzt bearbeitet:
- Beiträge
- 4.070
I am getting better at BRouter 
https://brouter.de/brouter-web/#map...5,43.56385&profile=vm-forum-velomobil-schnell
So we can add to the above 292 vertical metres, a flatter route is available to the same destination but it doesn't have the 1 km 5% hill...
https://brouter.de/brouter-web/#map...5,43.56385&profile=vm-forum-velomobil-schnell
So we can add to the above 292 vertical metres, a flatter route is available to the same destination but it doesn't have the 1 km 5% hill...
- Beiträge
- 4.070
5% hill? That counts as almost flat around here
That was a flat training drive! It is just that hill is almost 1 km long and has great surface and no dangerous crossroads so you can really let it go down that one. Some of the steeper ones are not so friendly.
- Beiträge
- 4.070
So here we are, 4,000 km driven including a 2500 km tour across the whole of France there and back, time for a review? I think so too! 
My note is 8.5/10, let's begin with the negative points:
- I am not comfortable in the seat on long distances. The seat was fine for daily driving I thought but on long distances (169 km) and long days (10 hours, not the 169 km day!) I need a vertebrae relief slot down the middle of the seat back. Now that I am back I know that will also make it much more comfortable on 27 km drives as well.
- I am still not a fan of the door. I get in and out much easier now after a lot of practice but I just can't stop myself from sometimes banging my head. Being bald that leaves marks... My preference remains an opening top.
- the last negative point is a self inflicted problem, I built mine too heavy. I know where and why and it is 100% my own fault. So this negative point is about my Agilo, not Agilos in general but builders please don't make the same mistake!
Positives:
- because of the wide track Agilo is a very forgiving vélomobile for beginner drivers.
- the result is great handling and precise steering even in difficult conditions, it tracks like a train in the 45 to 55 km/h speed range. Things don't get worse at higher speeds but you have a lot more to watch out for above 60 km/h, it is a velocipede after all.
- the design is not susceptible to cross winds (unless the gusts are very strong, there are limits for every VM). This is great when meeting or being passed by large logging trucks going very fast. Or busses or most anything on the road. On my trip 1 large truck in Switzerland pushed me off the road when it came up behind me. I don't know what was particular about that truck, maybe he just passed me VERY close? Because the same day on the same road there were lots of other trucks and it did not happen with them.
- there is lots of room inside. I sat in a Bülk at Spezi and the guy dropped the racing hood, that is definitely not my thing!
- the ventilation system invented by the designer is almost scary because it works so well. Wet T-shirt in front and dry in the back is something that has to be experienced!
- wood is a great material for vélomobile construction. Sound and heat insulation, vibration absorbing (within limits, I could show you "roads" in rural France...) and it even feels good to the touch and to the view when you are inside for long periods of time. Agilo is a nice place to be on the road.
- rain protection of course. And another advantage of the closed cabin is protection from objects thrown by trucks, happened again on the way home from Spezi. Something hit the windscreen hard and at speed, I hate to think what would have happened in a head out vélomobile...
- the plan is easy to follow and the build is easy too. Of course I have built lots of boats from plywood in my life so that is probably a subjective opinion. If you have done some woodworking before you can build an Agilo. Mine is not quite symmetrical because one day I was not being careful enough. It is wood, I could have cut out the piece I glued in too long and started again but I pushed on. I annoyed Bodo Sitko one day suggesting that I could just cut the top and sides off and redo them in poplar plywood to fix that and lose some weight at the same time. Of course at the time he just wanted me on the road and driving
- it does what it was designed to do quite well. And then some idiot went and did what it was never intended for - drove it across a whole large country... There and back!
Executive summary:
I would build another one. It would weigh a lot less. It would have a couple of small tweaks to make it more suited for long distance travel because we have discovered it can be a traveller as well as a daily driver!
If you want an easy to use daily driver vélomobile buy a plan and build one!
My note is 8.5/10, let's begin with the negative points:
- I am not comfortable in the seat on long distances. The seat was fine for daily driving I thought but on long distances (169 km) and long days (10 hours, not the 169 km day!) I need a vertebrae relief slot down the middle of the seat back. Now that I am back I know that will also make it much more comfortable on 27 km drives as well.
- I am still not a fan of the door. I get in and out much easier now after a lot of practice but I just can't stop myself from sometimes banging my head. Being bald that leaves marks... My preference remains an opening top.
- the last negative point is a self inflicted problem, I built mine too heavy. I know where and why and it is 100% my own fault. So this negative point is about my Agilo, not Agilos in general but builders please don't make the same mistake!
Positives:
- because of the wide track Agilo is a very forgiving vélomobile for beginner drivers.
- the result is great handling and precise steering even in difficult conditions, it tracks like a train in the 45 to 55 km/h speed range. Things don't get worse at higher speeds but you have a lot more to watch out for above 60 km/h, it is a velocipede after all.
- the design is not susceptible to cross winds (unless the gusts are very strong, there are limits for every VM). This is great when meeting or being passed by large logging trucks going very fast. Or busses or most anything on the road. On my trip 1 large truck in Switzerland pushed me off the road when it came up behind me. I don't know what was particular about that truck, maybe he just passed me VERY close?
- there is lots of room inside. I sat in a Bülk at Spezi and the guy dropped the racing hood, that is definitely not my thing!
- the ventilation system invented by the designer is almost scary because it works so well. Wet T-shirt in front and dry in the back is something that has to be experienced!
- wood is a great material for vélomobile construction. Sound and heat insulation, vibration absorbing (within limits, I could show you "roads" in rural France...) and it even feels good to the touch and to the view when you are inside for long periods of time. Agilo is a nice place to be on the road.
- rain protection of course. And another advantage of the closed cabin is protection from objects thrown by trucks, happened again on the way home from Spezi. Something hit the windscreen hard and at speed, I hate to think what would have happened in a head out vélomobile...
- the plan is easy to follow and the build is easy too. Of course I have built lots of boats from plywood in my life so that is probably a subjective opinion. If you have done some woodworking before you can build an Agilo. Mine is not quite symmetrical because one day I was not being careful enough. It is wood, I could have cut out the piece I glued in too long and started again but I pushed on. I annoyed Bodo Sitko one day suggesting that I could just cut the top and sides off and redo them in poplar plywood to fix that and lose some weight at the same time. Of course at the time he just wanted me on the road and driving
- it does what it was designed to do quite well. And then some idiot went and did what it was never intended for - drove it across a whole large country...
Executive summary:
I would build another one. It would weigh a lot less. It would have a couple of small tweaks to make it more suited for long distance travel because we have discovered it can be a traveller as well as a daily driver!
If you want an easy to use daily driver vélomobile buy a plan and build one!
Nicht zwingend erforderlich , nur mit Werkzeug sollte man schon einigermaßen umgehen können.. If you have done some woodworking before you can build an Agilo.
Meine Karrosserie ist jetzt soweit fertig obwohl ich außer einigen Holzleisten seit meiner Schulzeit nie mit dem Material zu tun hatte.
Der Plan sagt dir was zu tun ist aber nicht wie ,für mich war das genau richtig - etwas geistige Herausforderung.
Aber jederzeit kann man bei Bodo nachfragen und allein schon dieser Faden gibt ziemlich viele Tipps.
Da bin ich aber froh .Wenn das einem Meister des Handwerks auch geschieht muss ich mich nicht schämen --meines ist nämlich auch etwas unsymmetrisch .Sieh es mal so sie haben Charakter.Mine is not quite symmetrical

