Agilo velomobile

:oops: Thats slower than i thougt, like an upright bike maybe? At that speed you should be able to let go of the steering in any velomobile.

As a large enough person in jeans and polo shirt I never managed to get the upright pedelec over about 68 km/h*, there is a kind of wall there. It didn't stop me from leaving many RR types behind in the dust on that particular hill - maybe 50-622 tyres, hydraulic brakes and no fear helped?

I went shopping this week and once again I hit the Bafang LCD 56.3 km/h limit. This time I was watching for it and noticed that I was still accelerating even though the LCD speed stayed the same. With my tyres that translates to 60.24 real km/h, the road is limited to 50 km/h and there is an intersection in a curve. The lady in the Renault Clio that pulled out from that intersection in front of me accelerated sufficiently so that I di not have to brake. (y) So maybe 65-70 km/h? Without a bike computer or GPS we will never know... :unsure:

I didn't try taking my hands off the tiller (being in a curve) but once again I marvelled at the excellent road handling. With hydraulic brakes Agilo could be a 45 km/h L6e no sweat.


* I verified the KT LCD speed with a GPS, they were to within 0.1 km/h
 
Agilo is my first fully suspended bike. I know that rear suspension eats large quantities of Watts when climbing steeper gradients, that is why I chose a rear damper with lockout.

The remote hydraulic hose fell off last year and lost fluid so the lockout never worked. Until now... I finally fixed the remote last week, and the result on a very short test drive is an increase in climbing speed of about 4-5 km/h! This is on the last steep gradient before home, the one I drive every time I come home. I saw a speed of 19-20 km/h which was the usual speed on my last pedelec and also the trike with motor wheel I guess - no visible speedometer on that but the subjective speed felt the same.

More things are happening in the workshop so we will have to wait for a longer, more complete road test.
 
Time for another workshop report, mostly for current and future builders.

As you all know I did some very serious crash testing to see just how strong the Agilo is :rolleyes: The result was one bent axle, 2 bent wishbones and because of the state of the track my 2 Gocycle tyres did not do much over 300 km... The body is very strong! The French Basque Country has some of the most dangerous speed bumps you will ever see anywhere. To be approached with caution.

On the front there are now Conti Contact Urban in 50-406, half the price of the Gocycle. The wishbone situation is still being dealt with, I made a pair from high tensile 6 mm steel threaded rod and added 8x1 mm aluminium tube over the top. Not stiff enough... For the moment the VM.nl ones are back in but rotated 180º so the thread that was bent then straightened is now inboard. I still think that high tensile steel is a much better idea than thread welded to 10 mm stainless tube and I have found a source for 10 mm x 2 mm carbon fibre tube. I can now remove and install the front suspension with my eyes closed. I really need to find a better method of setting the track than inexperienced helpers. Or an 80 kg person to sit in the seat while I do the measuring...

This is a very disappointing situation because exactly one year ago today Bodo Sitko stopped for a visit and the track was perfect.

In my order to Ginkgo were new PTFE chain tubes. The original slack side tube was too short and I managed to send the drive side one around the chainring when it broke free :rolleyes:. Builders, I recommend PTFE because you can see if the chain has a twist in it. It is also as slippery as heck and so it makes a lot less noise, just testing on the trestles in the workshop things are much smoother. Threading 3 lengths of bicycle chain through an almost totally enclosed drive train is a real mission. I have installed the chain tensioning bungee cord system from the plan at the front thanks to the longer chain tube. This is all you need if you are using a single chainring on the front, it is perfect for absorbing suspension movement. With 2 x chainrings and 14T difference between the 42T and 56T the derailleur/tensioner at the back was not enough to keep the slack side tight enough - I had chain slap and an occasional jump at the rear, especially when using the 42T. Now the front shifts much better and we will see on the first garden run if the chain slap problem is solved.

I removed the plastic 13T Alligt idler pulley from my trike parts box and replaced it with the 16T aluminium Ginkgo one. A small criticism @Lutz/Co, the cable ties provided are nice and thin but two of them slipped, not a good idea... So builders just use some better narrow cable ties from your parts box that grip and don't come loose. Holding both idler pulleys in your hands you feel the build quality of the Ginkgo pulley oozing through your fingers :giggle:

Returning to the workshop earlier in the week I got to try suspension lockout again and... Everyone seated? Managed 24 km/h up a >6% street in assist level 5 running 42:16 and 11th direct drive gear. I even had to slow my cadence to stay at 24 km/h. So I think we can safely assume that if you drive regularly on longer gradients over 5% you will see a gain in performance with a locked out rear suspension. This applies to driving on asphalt of course, Land Rover mode not recommended with locked out rear! Further back in this thread I was complaining of only reaching 17 km/h when climbing with full assist, see how far we have come! :D

So the rear end is now working perfectly for me. I can imagine driving most places on the road with the suspension locked out and the fat Maxxis DTH on the rear wheel keeping things smooth with 3 bar pressure. Then when you hit a flat or downhill bumpy section switch to full suspension.

Building?

- if you are planning on using a Rohloff then cut passages for the shift cables on the left side of the central tunnel. They are a real pain in the rear when they share the space with the chaintubes on the right. It works, the proof is that mine run there, but any intervention on the chain/chain tubes they will drive you nuts... This does not apply to the Alfine 11 single shifter cable, there is no problem with it sharing that space.

- If you are intending on using a rear air damper with lockout (hydraulic or cable) that is the best place to run that cable/tube as well. If you get one that is long enough you can mount the lockout button on the tiller shaft within reach.

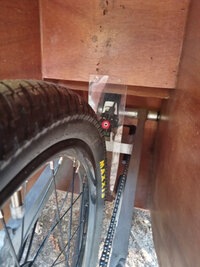
- mount your air damper with the controls on the bottom where it attaches to the swing arm. I had it the other way around and it was VERY difficult to get to the air valve and the rebound lever. I was looking at photos of MTBs and noticed they are often mounted upside down like that and we all know the kind of treatment they get on a MTB! I will make a polycarbonate muck guard to protect it. It will just screw to the top and bottom of the wheel well and because it is transparent you can see the rebound lever setting and the air valve.

That is all for today, I still haven't finished. Extensive road testing, more tweaks and photos to come!
 
tidy.jpg

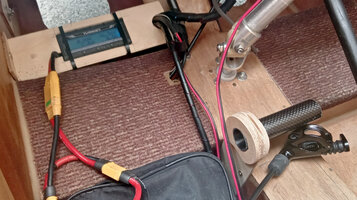
The ice cream box electronics box is in the recycling bin finally! The electronics now live in a small wooden box in front of the suspension tunnel. I need to do some more wire tidying before screwing down the lid. The top of the box is 1 cm below the tunnel, not obvious in this photo, so no risk of standing on the Wattmeter screen.

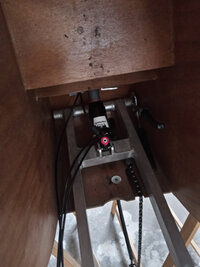
The nylon steering shaft bearing is in the correct place now, in the tunnel! :giggle:

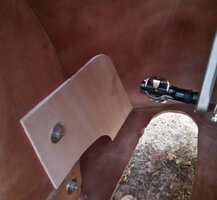
The damper lockout lever has a support. The support is very long? :unsure: Because the Bafang LCD will migrate down there and a cycling computer will take its place up on the top showing the real speed, and up to 99 km/h! Plus other interesting information like the time and the temperature inside etc. etc. And of course statistics.

This might be the first photo of the carpet? Going to the vegetable garden I sometimes have a little mud in the SPD cleats, the carpet helps brush that off when I get in.

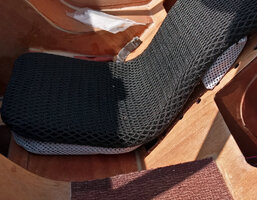
I have a new seat cushion under the Ventisit and a lumbar support cushion too.

More stuff soon.
 
Photo of the new cushions:

cushions.jpg

The seat cushion is now 2 pieces of yoga mat and not 3 with a complicated cutout in the middle for the Ventisit velcro.

And having driven the trike exclusively since June the lumbar support was missing in Agilo. Once again two strips of yoga mat to get the curve.

And of course the carpet is also on the doorstep. In fact it is a very lightweight Ikea door mat! (y)
 
Test drive! About 24 km and 119 vertical metres climbed.

PTFE chain tubes + larger, better Ginkgo idler pulley = driving joy not experienced until now! Silence, the only noise in the cockpit is the motor when it is running. It does not run as often as before, +3-4 km/h on average everywhere. 30-32 km/h up +1% and 40-42 km/h down. We will wait for the cycle computer before thinking about average speed but on the flat I think it is going to be a big surprise. That was all without the side windows... :cool: Not the most aerodynamic configuration! And what if I added wheel disks! :unsure:

Lots of the smooth road driving was done with the air damper locked. A small effort on any -1% is rewarded by >48 km/h in 14th gear, that is a cadence of 97+. And climbing is now done at pedelec speeds - let's be clear, at very heavy pedelec speeds. I used 2nd gear to climb up to the vegetable garden but on the cycle path up the cliff only down to 5th gear. So driving with a single 56T chainring has become a reality at last.

I removed the derailleur/tensioner and tensioned the slack side tube with bungee cord as shown on the plan. The tension is roughly the same but not quite enough to use the 42T chainring I think (I didn't test).

I am a little bit disappointed by the feeling of the Continental Contact Urban 50-406 after the Gocycle. There is a certain "je ne sais quoi" in the handling, some more km will help form a better opinion.

I have to get used to the new cushion, the seat is a little harder without the 3rd strip of foam at the front. Lumbar support could be a little softer too, the shape is perfect but the trike mesh seat offers less resistance when pedalling hard.

So Agilo builders, PTFE tube is not only for racers! I strongly recommend the Ginkgo 16T idler pulley. And if you are driving smooth roads a rear damper with lockout is worth the investment, even in flatter lands.

So far this long workshop session has been very positive when it comes to performance!
 
Zuletzt bearbeitet:
I have decided I can no longer live with the fantasy Bafang speed indication on the LCD and ordered a Sigma wireless computer. Is gradient and cadence worth an extra 30€? No, steep is steep and too bloody steep can be judged by eye.

Cadence is much easier to know: if you are driving 30 km/h in 11th gear your cadence is 90 rpm, 27 km/h = 80 rpm and 33.5 km/h = 100 rpm. Once you have memorised physically what it feels like to spin 90 rpm etc. you can guess your cadence on any other gear.

I also get a couple of features the Chinese don't understand are kind of important - the time (I don't have a smartphone) and the temperature which is kind of useful with a BBS01 motor. When cabin temperature rises much above 25º C you need to turn down the assistance level to prevent the motor controller from overheating.

You have guessed I will have the new 10.0 STS model :giggle: Magnet and sensor on the right hand wheel, Bafang sensor on the left. The Bafang LCD migrates down to the new holder on the tunnel where I can press the assistance level buttons and glance down to see the assistance level on the screen. The correct battery voltage is shown on the Wattmeter so I have to stop to read that properly.
 
tidy-inside.jpg

So all the controls for motor and suspension in the same place now. The inside is quite tidy, the wiring could be simpler but other than that I am happy.

I have started doing a few paint touch ups outside, not a full paint job, not enough time for that. ;) Then the windows go back in and more testing, the bike computer should leave Germany soon?
 
I can now remove and install the front suspension with my eyes closed. I really need to find a better method of setting the track than inexperienced helpers. Or an 80 kg person to sit in the seat while I do the measuring...
Plan C:
mit einer 80kg Person die Spur richtig einstellen, dann leer messen und merken/aufschreiben. ;)
Den letzten Schliff bringt eh nur ein Rolltest.

Gruß Jörg
 
Zu das Feder und Pogo Verhalten; Vielleicht ist es gut zu melden das beim Agilo eine deutlich andere Schwinge benutzt wird. Dieses Model hatt das Zwischengetriebe an die Schwinge. Vor das Drehpunkt sitzt das ZG, an denn Arm hinter das Drehpunkt wird das Rad montiert. Ich wurde nicht ausschliessen das dies eine Rolle spielt bei das verhalten, wenn viel Zug auf die Kette kommt.
 
The agilo swing arm is from the Leiba X-stream not the Classic, on the classic you have a sprocket just in front of the pivot point. The agilo geometry is similar to many vélomobiles with a single idler pulley under the seat. They will probably all benefit from having remote lockout on the rear damper just like MTBs profit from lockout on the rear AND on the fork.

There is no real Pogo action but there is a little bit of squat when you start off. The delivery of torque by the motor up to 25 km/h is constant so in flatter places you will not notice much at all. Once you start on the >7% climbs if you push hard and the motor is only assisting the phenomenon becomes evident.

My opinion is that if you drive your agilo over longer distances with gradients above 4-5% you will profit from having a lockable rear damper. It is a 100-120€ investment buying quality parts from China and you can double that sum (and more) using popular big name MTB dampers. I jumped on an occasion here on the forum before I had even started cutting wood and I do not regret that decision! If you live and drive somewhere flat there will not be a huge gain - we are not racing ;)

The whole history:

- in the beginning my air shock was pumped up too hard so I was climbing quite fast
- the motor controller was not programmed so I was not satisfied with the speed/performance all the same
- Bodo SItko pointed out to me that the rear suspension was not working correctly so I went to an online damper calculator and set it to a more realistic pressure
- I gained comfort but noticed that climbing speed had left the building... I could not lock the damper because I had lost hydraulic fluid from the remote :(
- the motor controller was correctly programmed and I still did not gain the performance I expected
- I fixed the lockout - after looking for an expert I just bought the Rockshox kit and did it myself :rolleyes:
- climbing performance on smooth roads with steeper gradients is now pedelec level - close to 24 km/h up to about 7% gradient. Here near my home 17-19 km/h.
- sprinting on the flat with the suspension locked out is a lot more fun than it was :cool:
- I like to spin, not stamp hard and I gain 4-5 km/h with the damper locked out
- one of my favorite VM is the WAW with a rigid rear end...

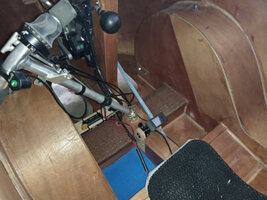
As you can see in the photo above (#770) I now just reach down between my legs and lock or unlock the damper depending on how I need the rear suspension to react.

I-wish-I-had.jpg

The damper is mounted "upside-down" like on many MTB so I have access to the damper rebound setting lever and the valve. Now there is a polycarbonate splash guard between the rear tyre and the damper. Transparent so I can see the rebound setting and the valve cap when I need to play with the damper settings.

You can't guess in this photo (the chain is released) but the drive side of the chain passes very close to the pivot point and runs parallel to the arm.
 
A longer "flat" test drive, there are always a couple of hills leaving home in my flat drives.

- the Sigma computer shows a speed difference of at least >1 km/h compared to the Bafang LCD. This is very good for the morale! :giggle:
- the average speed is significantly more than the Bafang estimation, champagne! :LOL:
- everything I stupidly broke is fixed again, the steering steers, the suspension suspends, the brakes brake (like coupled brakes do) and the track seems perfect.
- the clock is great, you know when it is time to stop
- the thermometer helps a lot even if today it was showing 35.2ºC :eek: Yes in the shade. And yes the BBS01 felt warm to the touch for the first time...
- damper lockout ON for climbs and smooth flat roads and OFF for bumps and faster downhill sections

My natural cadence is around 90 rpm, with an exact speed indication and in 11th direct drive gear I was able to confirm that. The range is probably 85-95 rpm depending on gradient. Today the lowest gear I used on the flat was 10th gear and several times I was in 14th and almost needing a larger chainring.

All of the work plus the higher end parts - chain tube, idler pulley - have brought significant speed gains and a more pleasant, quieter driving experience. I wish I had not lost the Gocycle tyres because I think they would be faster and more comfortable than the CCU's.

So luggage compartments, a tent and lots of optimisation work, what for? The French vélomobile meeting is next Saturday and I leave on Wednesday :cool: 470 km with a 3 day leisurely driving time (retirement...). The first 23 km are Basque with typical vertical metres and then the rest you saw on the Green Mamba Tour videos. I will not be using the E1, there are quiet departmental roads parallel to that where my new found flat land >30 km/h cruising speed will be more adapted.

A driving report will be created in the bike tour section, maybe live maybe after I get back depending on WiFi availability.
 
Some photos of stuff I did before my short trip:

splash-guard.jpg

Here you can see the strip of polycarbonate I screwed in (top and bottom) as a splash guard for the air damper. I left space for the chain of course. You can also see the small white rectangle which is a piece of PTFE tube on the bottom of the slot where the drive side chain goes through the body, it is held in by pressure on the sides of the slot. From time to time on bumps the chain was rubbing on the wood there - I don't hear that noise any more.

lugage-compatment.jpg

One of the luggage compartments I hacked together before leaving. The right hand side did not survive the first (or second?) railway crossing, it jumped out at the bottom and was destroyed by my foot... :rolleyes:

Builders if you plan on going on camping trips with your Agilo it is a very good idea to design and glue in a luggage compartment before you put the front hood on. I would suggest a shape that curves upwards from the middle or just slightly above the middle of the wheel well side to the nose. A hole at the bottom as shown above will be useful for cleaning out dust or letting a wet tent drain out through the foot hole. If your stuff is in a bag there is no problem putting it in and pulling it out over the top of the wheel. Lightening holes can be drilled in the panel but don't overdo it, you need some strength to hold a 2 kg tent - speaking from experience ;) There are lightweight bags from Decathlon - Domyos fitness bag - in 20 or 30 litre sizes that fit in there, next time I will use a 20 litre one to hold a 1.5 litre bottle of water or the tent poles and a sleeping bag for example. I discovered that even if you drive slowly and carefully things jump around a lot in front there as soon as there are bumps.

My larger cutouts to access the rear compartments allowed me to use one of the above 30 litre bags for my clothes on the right hand side and the left hand side held my very large self inflating sleeping mattress. It is 65 cm wide so part of it comes into the cabin and serves as an armrest. Lightweight stuff in the top compartment.

Electrics box My new electrics box is fine but a much better place for that would be under the 40 x 40 tube behind the mast. That is also easier to build and install before gluing the top on. Mine gets sand from the right shoe when I get in despite me cleaning the soles before getting in. The support for the LCD and the damper lockout works quite well.

Ideas from the longer drive experience:

- I would love to do a tank steering conversion similar to the one @Felix did on his Quest. But we have a door and the left hand steering lever would make access complicated. It would need a sturdy but simple connection on the bottom allowing the driver to disengage the left hand lever and push it forwards out of the way for getting in and out
- separate brakes with real brake levers are a must where I live. The tiller braking system is not adequate and requires constant adjustment. Tank steering solves that problem!
- on the top of the tank steering bar a 3D printed holder for my funky turn signal buttons would be great. The damper lockout on the steering would be cool too.
- the Sigma and the LCD on the mast one above the other. I would cover the LCD speed reading with a piece of black tape so only the reading from the Sigma would be visible

You have a lot of time for thinking when driving longer distances :LOL:
 
- separate brakes with real brake levers are a must where I live. The tiller braking system is not adequate and requires constant adjustment. Tank steering solves that problem!
There are more ways to design tiller steering!
Can't find the version with road bike handlebar at the moment...
 
There are more ways to design tiller steering!
Can't find the version with road bike handlebar at the moment...

Watch this space ;)

Tank I like for the arm position and having been corrupted by my trike since 2017 :giggle:
 
Other things I should mention:

The Sigma wireless computer.

When driving along the port of Bayonne I suddenly lost all speed indication. Damn, the magnet has slipped! Got out and everything seemed fine. Broken already? Then I looked to the left and there was the electric feed to the railway line... :rolleyes: As soon as I drove a few 100 metres away the speedo came back on line. I still prefer the luxury of not having another wire to feed through the body.

Continental Contact Urban 50-406

The track is set correctly, I can still read the Continental logo on the running band :giggle: They are OK but I drove long enough with the Gocycle tyres before messing up the front end to say they are definitely a faster tyre and more comfortable. Very subjective I know but often comments on tyres are of a subjective nature.

Tyre size and calibration of the Bafang LCD

At a cruising speed of 25 km/h the Bafang speed reading is inferior by about 1.5 km/h (I have to look down between my legs to see exactly how much it varies...) so of course my 1050 + km with that motor is in fact a little more.
 
Zurück
Oben Unten